Friday, January 31, 2014

OpenTX, Using Your Trainer Switch as a Toggle.

I've had my 9xr transmitter for a long time now and I've always wanted to be able to use the trainer switch for something useful.  I spent a few hours experimenting yesterday and figured out how to assign the Trainer as a toggle in 3 different ways:
  1. Simple toggle switch.  Flip the trainer once and the channel you assign it to goes to 100%, flip it again and that channel goes to -100%.
  2. Complex toggle switch for a single channel.  The channel defaults to -100%.  Flip the trainer once and it goes up to -50%.  Flip it again and it goes to 0%.  Again and it goes to 50%.  Flip it again and it goes to 100%.  Flip it for a 5th time and the channel resets to -100%.
  3. Complex toggle controlling multiple channels.  All channels default to -100%.  Flip the toggle once and channel 1 (or whatever you assign it to) goes to 100% and LOCKS at that number.  Flip it again and channel 2 goes to 100% and locks in place.  This will continue for the other three channels assigned.  If you flip the switch 6 times all channels will reset to -100%.
 First step to implement this is to setup your custom functions.  All three methods use the same custom functions, so I'm only going to list this once.

Go to the Custom Functions tab for the model you're working on (you have to do this companion9x so that can change the "Param" to "Increment").

Make sure that your Custom Functions look exactly like what is pictured below.


Simple Toggle Switch


First thing you're going to want to do is define some custom switches.  Make sure that your Custom Switches look exactly like pictured below:


Next step is to add your mix to the channel you want to control.  I'm controlling channel 5 in the following example:


Single Channel Complex Toggle


First thing you want do is setup your custom switches as pictured below:


Next step is to setup your mix for the channel you want to control, I'm using channel 5 in the following example:


Five Channel Complex Toggle


First thing you're going to need to do is setup your custom switches.  Make sure you custom switches are exactly like pictured below:


Next step is to set your mixes.  I'm using channel 5 through 10 in the following example:


You can alter the number of channels/positions in either of the complex toggles by playing around with the custom switches page.

Friday, February 22, 2013

A Tale of Three Companies ...


Hopefully most of you are aware that there are two major players in video chipsets currently.  AMD (which used to be ATI) and Nvidia.  A lot of the older computer nerds out there will remember there used to be a third, 3dfx.  3dfx invented a graphics API called Glide and manufactured a chipset to run it that was superioir to both Nvidia and ATI's offerings in the 90's.  Now, many of you are probably wondering, "Why haven't I ever heard of 3dfx?".

That's where this cautionary tale hits a curve.  You see, back in the 90's, 3dfx sued Nvidia for patent infringement on it's Glide graphics cards.  This wasn't a patent troll suit like companies use today, this was real infringement.  The reason you've never heard of 3dfx is because Nvidia counter sued 3dfx in order to try and force them to settle.  Nvidia had much deeper pockets than 3dfx did and 3dfx wasn't able to weather the storm.  Nvidia waited until 3dfx was low in cash and then proceeded to buy them out in a forced takeover.  Once they owned the company, they immediately disbanded it.  It was much easier to buy them out than to compete with them.
So now rather than a tale of three companies, there is a tale of only two.  Graphics cards of course became more expensive after that as there was less competition.  The reason I'm pointing this out is that Samsung has market capital of roughly $200 billion dollars.  Apple on the other hand has a market capital of $420 billion.  If Apple can continue to file these patent troll suits and damage Samsung's brand through the courts, how long will it be before Apple is Nvidia buying out Samsung/3dfx?  What exactly would the future be like with only one company that makes mobile technology and no one having deep enough pockets to compete with them?

Tuesday, November 27, 2012

How to change themes for Android Gingerbread

Step 1: Press the menu button. A menu should pop up that appears like this ...

Step 2: Tap on "Home Settings".


Step 3: Tap on "Theme".


Step 4: Tap on "Android Standard" to select it.


Step 4: Tap on "Application Icons".


Step 5: Tap on "Default" to select it.


Step 6: Tap on "Save" to save your settings.


If you've done everything right you are hopefully using the default Android theme, I like it much better than the one that came installed on my phone by default.


How to Quickly Uninstall an App on your Android Phone

Update: Apparently this only works if you have the Huawei launcher installed.  If you don't have the gear icon at the bottom right of your apps screen this will not work for you.
Step 1: Tap the Applications icon.  That would be the icon in the bottom middle that looks like 4 x 4 grey squares.


Step 2: Click on the gear icon at the bottom right of the screen.


Step 3: Tap the red cross in the top left corner of the app that you wish to uninstall.


Step 4: Tap on "OK" to confirm the uninstall.


Step 5: Tap on the green check mark icon to go back to choose application mode.


Creating Contact shortcuts on an Android home page

This makes the home page pretty useful, especially if you have to call a certain number multiple times a day.

Step 1: Long press anywhere on the home screen until a menu pops up.
Step 2: Tap "Add shortcut".


Step 3: Tap "Contact".


Step 4: Tap on the Contact that you wish to make a shortcut to.


Step 5: Long press on the Contact to allow you to move it to where you want it on the screen.


Step 6: Done.


You can now tap the Contact's shortcut and pick whether to call them, pull up their contact info, send them an SMS, email them, go to their web page, and so on depending on what info is stored in their contact on your phone.


There are a few different ways to interact with contacts, you can also direct dial them or direct SMS them from a shortcut!


Syncing your Android phone with Gmail

Step 1: Push the menu button on your phone.
 

Step 2: Tap on "Settings".


Step 3: Tap on "Accounts and sync".


Step 4: Make sure that Auto-Sync is checked.  I prefer Background Data to be checked as well.  Tap on  your gmail account under "Manage Accounts".


Step 5: Make sure that "Sync Contacts" is checked as well as "Sync Gmail".  This will ensure that Google Voice Search functions properly with your contact list.


Step 6:  Push the Home button to save the changes.

Your gmail and contacts list should now sync on your phone.  You can now edit your contacts online from any browser by logging into gmail and going to Google Contacts.

Google Voice Fix for Android Phones


I've been using my Android phone for about a month now and I could never get Google Voice Search to work like in the help video.  If I were to say, "Call John Smith mobile," it would pull up a Google search of "call john smith mobile."  So it was recognizing what I was saying, but not using it in the way I intended.

After a month of being irritated with it not functioning properly and days of trying various "fixes" to get it to work I finally had a breakthrough yesterday!  When you create a contact on your phone you have two choices: "Phone" or "Gmail".  I had always chosen the first option.  This is the primary reason why Google Voice Search doesn't work for most people!

Caution:

In order to make this procedure less complex deletion of all your contacts after backing them up will be part of the process.  If you are not comfortable with doing this, please don't follow this tutorial!  This method does work as I've done it on my phone several times, but I can't be held responsible for someone not being able to restore their contacts.  Please follow this tutorial at your own risk!

What this Tutorial Does:

This tutorial will teach you to backup your contact list and then restore it while associating the contacts with a gmail account.  This may fix your Google Voice Search.


Backup Your Contacts:

Step 1: Open your contact list

Step 2: Push the menu button.
Step 3: Tap "Manage contacts".


Step 4: Tap "Backup to SD card".

 
Step 5: Tap "OK" to confirm the backup.


Step 6: Your contacts have now been backed up to a file on your SD card.

Deleting Existing Contacts:


Next thing you'll need to do is to delete all of your contacts.  If we don't do this step when we restore the contacts in our next step duplicates will be created.  If you are not comfortable with restoring your contact list from a backup, do not follow this tutorial any further!

Step 1: Press the menu button.
Step 2: Tap on "Multi-Select".


Step 3: Tap on "Select All".  All of the boxes for your contacts should get a check mark.


Step 4: Tap on "Delete".  Click "Delete" again to confirm deleting the contacts.


Step 5: Press the menu button.
Step 6: Tap on "Manage contacts".


Step 7: Tap on "Restore from SD card".


Step 8: Tap on your gmail account.


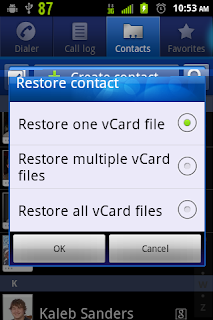
Step 9: Tap on "Restore one vCard file".


Step 10: Tap on the vCard file you created earlier.
Step 11: Tap on "OK".


Optional:

If you receive a notification warning stating "Sync, Too many Contacts deletes".


Step 1: Slide down the notification bar.
Step 2: Tap on the notification.


Step 3: Tap on "Delete the items".


Step 4:  All done!

Google Voice Search should work now to dial your contacts and send text messages.  If it doesn't work, more than likely you haven't setup your phone to sync your Gmail account.  We'll cover how to do that in my next blog entry.